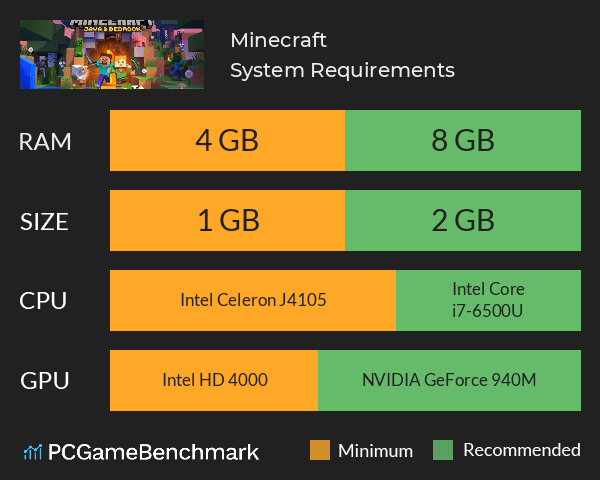
Adding more RAM to Minecraft makes the game run better. It gives more memory for loading worlds, rendering chunks, and running mods. You need to change Java Virtual Machine (JVM) settings in your launcher. This lets you increase memory from the default 2GB to what you want. Most people do well with 4-8GB of RAM, based on their computer and how they play.
Minecraft Java Edition needs enough RAM to play smoothly, like with mods, big worlds, or servers. The default 2GB is not enough for today’s games. It causes stuttering, long waits, and crashes. Knowing how to add more RAM helps the game run better and keeps your computer stable.
When you add the right amount of RAM, you’ll see big improvements. Vanilla Minecraft players might get better chunk loading and less stuttering with 4GB. But, if you play with mods, you might need 6-8GB for the best experience. It’s all about finding the right balance for your game and computer.

Why Allocate More RAM To Minecraft?
Minecraft needs more RAM for complex tasks like world generation and mod processing. It uses Java to load chunks, entities, and graphics. This makes it use a lot of memory.
Some signs show you might need more RAM for Minecraft:
- Frequent stuttering when loading chunks or exploring
- Extended loading times when joining servers or loading worlds
- Frame rate drops in busy areas or complex builds
- Out of memory errors during gameplay
- Slow response when opening inventories or interacting with blocks
The default 2GB RAM is old. It’s from when Minecraft had simpler graphics and smaller worlds. Now, with better graphics and bigger worlds, Minecraft needs more memory.
More RAM helps with loading worlds faster and keeps the game smooth. Without enough RAM, the game stutters and runs slowly.
How Much RAM Do You Need for Minecraft?
Vanilla Minecraft needs 3-4GB of RAM for the best performance. Modded games need 6-8GB RAM, depending on the mods. Don’t use more than 50% of your system’s RAM for Minecraft.
RAM Requirements by Gameplay Type
Vanilla Minecraft (No Mods): 3-4GB RAM is good for single-player and multiplayer. It handles standard tasks without slowing down.
Light Modding (5-20 mods): 4-6GB RAM works for most small mods. It keeps the game running smoothly.
Heavy Modding (50+ mods): 8-12GB RAM is needed for big modpacks. It handles complex mods and large worlds.
Modded Servers: 6-10GB RAM is needed for servers. It depends on the number of players and mods.
System RAM Recommendations
| Total System RAM | Safe Minecraft Allocation | Recommended Usage |
|---|---|---|
| 8GB | 3-4GB | Vanilla or light modding |
| 16GB | 6-8GB | Heavy modding, large worlds |
| 32GB+ | 8-12GB | Extreme modpacks, content creation |
Never allocate more than 50% of your total system RAM to Minecraft. Your operating system, background applications, and other programs require memory to function properly. Excessive allocation can cause system instability, slower overall performance, and potential crashes.
How to Check Current RAM Allocation
Press F3 in-game to display the debug screen showing current memory usage in the top-right corner under the “Mem” section. This real-time display shows used memory versus allocated memory, helping you determine if your current allocation meets your gameplay needs.
The debug screen displays memory information in the format “Mem: XX% YY/ZZMB” where:
- XX% represents the percentage of allocated RAM currently in use
- YY shows memory currently being used in megabytes
- ZZ indicates total allocated memory in megabytes
Healthy memory usage typically fluctuates between 30-70% of allocated memory during normal gameplay. Consistently high usage (80-95%) indicates insufficient allocation, while very low usage (under 20%) suggests over-allocation that wastes system resources.
Memory usage patterns vary significantly based on gameplay activities:
- World loading temporarily spikes memory usage to 80-90%
- Chunk exploration gradually increases usage as new areas load
- Modded gameplay maintains higher baseline usage due to additional content
- Multiplayer servers show more volatile usage patterns due to other players’ activities
How to Find Your System’s Total RAM
Open Task Manager using Ctrl+Alt+Delete, select Performance tab, then click Memory to view your total installed RAM capacity. This information helps determine safe allocation limits and prevents over-allocation that could destabilize your system.
Windows Method 1: System Information
- Press Windows key + R to open the Run dialog
- Type “msinfo32” and press Enter
- Locate “Installed Physical Memory (RAM)” in the System Summary
- Note the total amount displayed in gigabytes
Windows Method 2: Task Manager
- Press Ctrl+Alt+Delete and select Task Manager
- Click the Performance tab
- Select Memory from the left panel
- View total memory capacity in the top-right corner
Windows Method 3: System Settings
- Open Settings using Windows key + I
- Navigate to System > About
- Find “Installed RAM” under Device specifications
- Record the total amount for allocation calculations
Understanding your total RAM capacity prevents dangerous over-allocation. Computer systems require memory for the operating system, background processes, and other applications running simultaneously with Minecraft.
Step-by-Step Guide: Official Minecraft Launcher

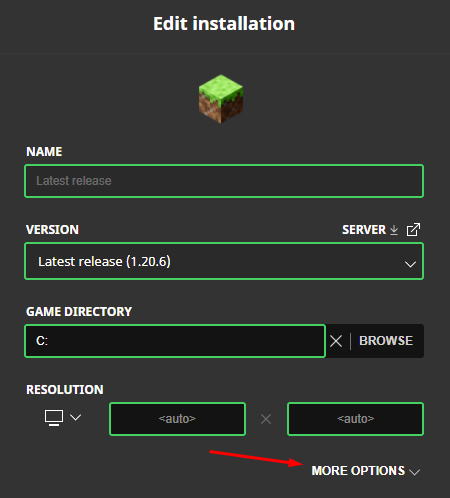
The Official Minecraft Launcher requires editing JVM arguments in the installation settings to modify memory allocation from the default -Xmx2G parameter. This process involves accessing installation profiles, enabling advanced options, and modifying Java memory parameters.
Detailed Allocation Process
- Launch Minecraft Launcher
- Ensure Minecraft is completely closed before beginning
- Open the official Minecraft Launcher application
- Verify you’re using the Java Edition section
- Access Installation Settings
- Click the “Installations” tab at the top
- Locate your desired installation profile
- Click the three-dot menu next to the installation
- Select “Edit” from the dropdown menu
- Enable Advanced Options
- In the Edit Installation window, scroll down
- Click “More Options” to expand advanced settings
- Locate the JVM Arguments text field
- Modify Memory Allocation
- Find the “-Xmx2G” parameter in the JVM Arguments
- Change the number to your desired RAM allocation
- Examples: “-Xmx4G” for 4GB, “-Xmx6G” for 6GB, “-Xmx8G” for 8GB
- Save and Test
- Click “Save” to apply changes
- Launch Minecraft to test the new allocation
- Press F3 in-game to verify the memory change
Important Considerations
The JVM Arguments field contains multiple parameters separated by spaces. Only modify the -Xmx parameter unless you understand advanced Java configuration. Additional parameters control garbage collection, optimization flags, and compatibility settings that shouldn’t be changed without technical knowledge.
Common memory allocation values include:
- -Xmx3G: 3GB allocation for vanilla gameplay
- -Xmx4G: 4GB allocation for light modding
- -Xmx6G: 6GB allocation for moderate modding
- -Xmx8G: 8GB allocation for heavy modpacks
Alternative Launchers: CurseForge Method
CurseForge provides a user-friendly slider interface for RAM allocation without requiring manual JVM argument editing. This launcher simplifies the memory allocation process through graphical controls while offering both global and profile-specific settings.
Global Memory Settings
- Open CurseForge Settings
- Launch the CurseForge application
- Click the settings gear icon in the bottom-left corner
- Navigate to the settings menu
- Access Minecraft Settings
- Select “Minecraft” from the game list on the left
- Scroll down to locate Java Settings section
- Find the Allocated Memory configuration area
- Adjust Memory Allocation
- Use the memory slider to set desired RAM amount
- The slider displays values in megabytes (1024MB = 1GB)
- Set appropriate allocation based on your system capacity
Profile-Specific Settings
- Select Target Profile
- Go to “My Modpacks” section
- Click on the modpack profile (not the Play button)
- Access the profile management interface
- Open Profile Options
- Click the three-dot menu next to the Play button
- Select “Profile Options” from the dropdown
- Navigate to memory configuration settings
- Override System Settings
- Uncheck “Use System Memory Settings”
- Adjust the memory slider to desired allocation
- Save changes automatically apply
CurseForge’s memory allocation affects only Minecraft instances launched through the CurseForge launcher. The official Minecraft launcher maintains its separate memory settings, requiring individual configuration if you use multiple launchers.
Alternative Launchers: Other Popular Options
Modrinth, Prism Launcher, ATLauncher, and MultiMC each provide unique interfaces for RAM allocation with varying levels of complexity and customization options. These launchers cater to different user preferences ranging from simple sliders to advanced configuration panels.
Modrinth Launcher
- Select your target profile from the main interface
- Navigate to the “Options” tab on the left sidebar
- Enable “Override Global Memory Settings” checkbox
- Adjust memory using the slider control or type specific values
- Changes save automatically for immediate effect
Prism Launcher
- Choose the Minecraft instance you want to modify
- Click the “Edit” button on the right side
- Navigate to Settings in the popup window
- Check the “Memory” configuration box
- Increase or decrease memory allocation as needed
ATLauncher Configuration
General Settings Method:
- Click “Settings” in the sidebar navigation
- Select the “Java/Minecraft” tab
- Modify “Maximum Memory/RAM” option (values in megabytes)
- Apply settings to all ATLauncher instances
Instance-Specific Method:
- Navigate to “Instances” in the sidebar
- Click the settings button for your target instance
- Open “Java/Minecraft Settings” tab
- Adjust “Maximum Memory/RAM” for that specific instance
MultiMC Setup
- Right-click the instance requiring more memory
- Select “Edit Instance” from the context menu
- Click the “Settings” tab in the popup
- Check the box next to “Memory” configuration
- Change “Maximum Memory Allocation” to desired amount
Each launcher stores memory settings independently, allowing different allocations for various gameplay scenarios. This flexibility helps optimize performance for specific modpacks or gameplay styles without affecting other configurations.
Optimizing RAM Allocation for Different Scenarios
Optimal RAM allocation varies significantly between vanilla gameplay, light modding, heavy modpacks, and server hosting scenarios. Understanding these differences ensures efficient memory usage without wasting system resources or causing performance bottlenecks.
Vanilla Minecraft Optimization
Vanilla Minecraft performs optimally with 3-4GB RAM allocation on most modern systems. This amount provides sufficient memory for:
- Standard world generation and chunk loading
- Entity processing and AI calculations
- Texture rendering and graphics processing
- User interface and menu systems
Higher allocations (6GB+) don’t improve vanilla performance and may actually reduce efficiency due to increased garbage collection overhead. The Java Virtual Machine works more efficiently with appropriately sized memory pools rather than excessive allocations.
Light Modding Configuration (5-25 mods)
Light modding scenarios benefit from 4-6GB allocations depending on mod types:
- Quality-of-life mods (JEI, WAILA, minimap): +1GB above vanilla
- Performance mods (OptiFine, Sodium): No additional allocation needed
- Small content mods (biomes, items): +1-2GB above vanilla
- Optimization modpacks: May require less than vanilla due to efficiency improvements
Heavy Modding Setup (50+ mods)
Large modpacks require 8-12GB allocations to handle:
- Complex machinery (Industrial mods, tech trees)
- World generation overhauls (biome mods, dimension additions)
- Magic systems (spell casting, enchantment extensions)
- Automation systems (logistics pipes, advanced storage)
Heavy modpacks often include memory-intensive features like:
- Advanced rendering systems
- Complex AI behaviors
- Large data structures for mod interactions
- Extensive recipe and crafting systems
Server Hosting Considerations
Minecraft servers require additional memory overhead beyond client requirements:
- Player management systems and data storage
- World persistence and backup operations
- Plugin processing and event handling
- Network communication buffers and queues
Server allocations typically need 25-50% more RAM than equivalent client setups. A 6GB client modpack might require 8-10GB when hosted as a server with multiple concurrent players.
Common Issues and Troubleshooting
Excessive RAM allocation can cause longer loading times and increased stuttering due to Java garbage collection overhead. Finding the optimal balance between sufficient memory and system efficiency requires understanding common allocation problems and their solutions.
Over-Allocation Problems
Allocating too much RAM creates several performance issues:
- Longer startup times as Java initializes larger memory pools
- Stuttering during gameplay from extended garbage collection cycles
- System instability when other applications can’t access needed memory
- Reduced overall performance due to memory management overhead
Signs of over-allocation include:
- Memory usage consistently below 30% of allocated amount
- Periodic 1-2 second freezes during gameplay
- Other applications becoming slow or unresponsive
- System-wide performance degradation
Under-Allocation Symptoms
Insufficient RAM allocation manifests through:
- Constant memory usage above 85% of allocated amount
- Frequent stuttering especially during world loading
- Out of memory crashes with Java heap space errors
- Slow chunk loading and delayed world generation
JVM Argument Errors
Common mistakes in JVM argument modification:
- Incorrect syntax: Missing spaces or wrong parameter format
- Invalid memory values: Non-existent amounts like “-Xmx3.5G”
- Parameter conflicts: Contradictory settings that prevent startup
- Case sensitivity: Using lowercase letters instead of uppercase
Launcher-Specific Issues
Different launchers may exhibit unique problems:
- Official Launcher: Settings not saving due to file permissions
- CurseForge: Profile-specific overrides not applying correctly
- Third-party launchers: Compatibility issues with certain Java versions
- Modded launchers: Conflicts between launcher and mod memory requirements
System Compatibility Problems
Hardware limitations can prevent proper RAM allocation:
- 32-bit Java installations limited to 4GB maximum allocation
- Older graphics drivers causing memory conflicts
- Insufficient system RAM preventing desired allocations
- Background applications consuming too much memory
Advanced Performance Tips
Combining proper RAM allocation with Java optimization flags, graphics settings adjustments, and mod selection creates the most effective performance improvements. These advanced techniques work synergistically with memory allocation to maximize Minecraft’s performance potential.
Java Optimization Flags
Advanced JVM arguments can significantly improve performance when combined with proper RAM allocation:
-XX:+UseG1GC -XX:+ParallelRefProcEnabled -XX:MaxGCPauseMillis=200 -XX:+UnlockExperimentalVMOptions -XX:+DisableExplicitGC -XX:+AlwaysPreTouch -XX:G1NewSizePercent=30 -XX:G1MaxNewSizePercent=40 -XX:G1HeapRegionSize=8M -XX:G1ReservePercent=20 -XX:G1HeapWastePercent=5 -XX:G1MixedGCCountTarget=4 -XX:InitiatingHeapOccupancyPercent=15 -XX:G1MixedGCLiveThresholdPercent=90 -XX:G1RSetUpdatingPauseTimePercent=5 -XX:SurvivorRatio=32 -XX:+PerfDisableSharedMem -XX:MaxTenuringThreshold=1
These flags optimize:
- Garbage collection efficiency and frequency
- Memory management for better allocation patterns
- CPU utilization during memory operations
- Pause times to reduce stuttering
Graphics Settings Optimization
Coordinating RAM allocation with graphics settings maximizes performance:
- Render Distance: Lower values reduce memory usage
- Entity Distance: Affects memory allocation for mob processing
- Texture Quality: Higher quality requires more VRAM and system RAM
- Shader Support: May require additional memory allocation
Mod Selection Strategy
Choosing mods strategically prevents excessive memory requirements:
- Performance mods first: OptiFine, Sodium, Lithium optimize base performance
- Compatibility checking: Ensure mods work well together
- Memory profiling: Test memory usage with each mod addition
- Alternative selection: Choose lighter alternatives for heavy mods
Background Application Management
System optimization enhances Minecraft performance regardless of RAM allocation:
- Close unnecessary programs before launching Minecraft
- Disable Windows Game Mode if it causes conflicts
- Update graphics drivers for optimal memory management
- Monitor system temperature to prevent thermal throttling
Monitoring RAM Usage
Regular monitoring of Minecraft’s memory consumption helps optimize allocation settings and identify performance bottlenecks before they impact gameplay. Effective monitoring involves both in-game tools and external system utilities for comprehensive performance analysis.
In-Game Monitoring Methods
The F3 debug screen provides real-time memory statistics:
- Current usage percentage shows immediate memory consumption
- Allocated vs. used memory reveals allocation efficiency
- Garbage collection frequency indicates memory management health
- Frame rate correlation helps identify memory-related performance drops
Optimal memory usage patterns:
- 30-60% usage during normal gameplay indicates proper allocation
- Temporary spikes to 80-90% during world loading are normal
- Consistent 90%+ usage suggests insufficient allocation
- Under 20% usage may indicate over-allocation
External Monitoring Tools
System monitoring applications provide additional insights:
- Task Manager shows system-wide memory usage and Minecraft’s impact
- Resource Monitor displays detailed memory allocation patterns
- HWiNFO64 provides comprehensive system performance data
- MSI Afterburner overlays real-time performance statistics
Performance Correlation Analysis
Memory usage patterns often correlate with specific performance issues:
- Stuttering during exploration typically indicates insufficient RAM for chunk loading
- Frame drops in populated areas suggest memory pressure from entity processing
- Slow menu responses often result from memory allocation inefficiencies
- Extended loading times usually indicate either insufficient or excessive memory allocation
Regular monitoring helps establish baseline performance metrics and identify gradual performance degradation over time. This information proves invaluable for fine-tuning allocation settings and maintaining optimal gameplay experience.
Frequently Asked Questions
Does allocating more RAM always improve Minecraft performance?
No. Allocating more RAM does not always improve Minecraft performance and can actually decrease it in some cases. Excessive RAM allocation increases Java garbage collection overhead, causing periodic stutters and longer loading times. The optimal allocation depends on your specific gameplay scenario, mod usage, and system specifications.
Can I allocate RAM to Minecraft Bedrock Edition?
No. Minecraft Bedrock Edition does not support manual RAM allocation because it uses a different underlying architecture than Java Edition. Bedrock Edition automatically manages memory allocation through the operating system, and players cannot modify these settings through launcher options or configuration files.
How much RAM should I allocate if I have 8GB total system memory?
Allocate 3-4GB maximum. With 8GB total system RAM, never allocate more than 4GB to Minecraft to ensure your operating system and other applications have sufficient memory. For vanilla gameplay, 3GB provides optimal performance, while light modding may benefit from 4GB allocation.
Will allocating more RAM reduce my FPS?
Potentially yes. Over-allocating RAM can reduce FPS due to increased garbage collection pauses and memory management overhead. The Java Virtual Machine works more efficiently with appropriately sized memory pools rather than excessive allocations. Monitor your actual memory usage with F3 to determine optimal allocation.
Can I change RAM allocation while Minecraft is running?
No. RAM allocation changes require restarting Minecraft completely. JVM memory parameters are set during application startup and cannot be modified during runtime. Always close Minecraft, adjust launcher settings, then restart the game to apply new memory allocations.
Does RAM speed (MHz) affect Minecraft performance?
Yes, minimally. Faster RAM provides slight performance improvements in Minecraft, particularly for modded gameplay with frequent memory access. However, RAM capacity and proper allocation have significantly greater impact than speed. Focus on sufficient capacity before considering speed upgrades.
Can I allocate different amounts to different Minecraft profiles?
Yes. Most launchers support profile-specific RAM allocation, allowing different memory settings for vanilla, modded, and server profiles. This flexibility helps optimize performance for various gameplay scenarios without affecting other configurations.
What happens if I allocate more RAM than my system has?
Minecraft will fail to start. Attempting to allocate more RAM than physically available results in JVM startup errors and prevents Minecraft from launching. Always verify your system’s total RAM capacity before modifying allocation settings.
Conclusion
Allocating more RAM to Minecraft significantly improves performance when done correctly, but requires understanding your system capabilities and gameplay requirements. The process involves modifying JVM arguments in various launchers, with optimal allocations ranging from 3-4GB for vanilla gameplay to 8-12GB for heavy modpacks.
Success depends on finding the right balance between sufficient memory for smooth gameplay and avoiding over-allocation that can degrade performance. Regular monitoring through the F3 debug screen helps maintain optimal settings, while advanced optimization techniques can further enhance the gaming experience.
Remember that RAM allocation works best as part of a comprehensive performance strategy including graphics optimization, mod selection, and system maintenance. By following these guidelines and monitoring your specific usage patterns, you can achieve significantly improved Minecraft performance tailored to your unique gaming setup.
The key to successful RAM allocation lies in testing different settings, monitoring actual usage, and adjusting based on your specific hardware configuration and gameplay preferences. Start with conservative allocations and gradually increase until you find the optimal balance for your system and gaming style.